Monday 26 November 2012

Faith's Guide to Mica Powders Part 2

This is so exciting! There are tons of techniques you can do with Mica Powders, here are a few more of my favourites:

This first one is very simple, I just wanted to show the difference between the interference powders and the regular powders. So I've made a nice, easy mica background using the regular powders:

Basic Mica Background

I'm using the Festive set of micas. This is another one of the £13.99 sets which contains 6 little pots of pigment powder, a fine brush, and a mini-mister for setting the powders. I'm also using my Tim Holtz Distress Embossing Ink, which is a lovely sticky clear ink, and an ink-applicator tool.


I've covered my piece of white cardstock with clear ink using the tool, and I'm brushing on Winter Chestnut, which is a nice dark red colour.


And ta-da! Look at that!


You can set this with hairspray if you want to, or you can fill up the mini-mister supplied with tap water and lightly mist your cardstock. These Mica Powders contain a binding agent, so when they come into contact with water they become set and won't rub off.


Micas and Distress Ink

This next one is really fun, Micas will work with Distress Ink! Because Distress Inks stay wet longer than a regular inkpad, the mica powders will adhere to them.

I'm using Vintage Photo Distress Ink and Antique Gold Mica Powder from the Antique Tones set.


To begin with, cover your white cardstock with Distress Ink using either cut n dry, or an ink applicator tool like the one I've got here.


Next, add the mica powder straight away:


This looks wonderfully shiny on it's own! And you can get a lot of fun effects by simply mixing Interference Powders with different colours of Distress Ink.


But you can go one stage further, and add water!


Using the mini-mister from the Mica set filled up with tap water, give your cardstock a good squirt!


You can go in with a paintbrush as well, and flick some larger water droplets all over the cardstock


Because Distress Inks do fun things when they come into contact with water, as this dries, the Distress Ink will move out from under the mica powders giving a fabulous distressed background! You can then punch shapes from this, die cut out of it, or just use it as a background. Because you've got it wet, the micas will already be set.


Stamping with Micas and Distress Ink

You can create some fun effects combining distress inks with mica powders.

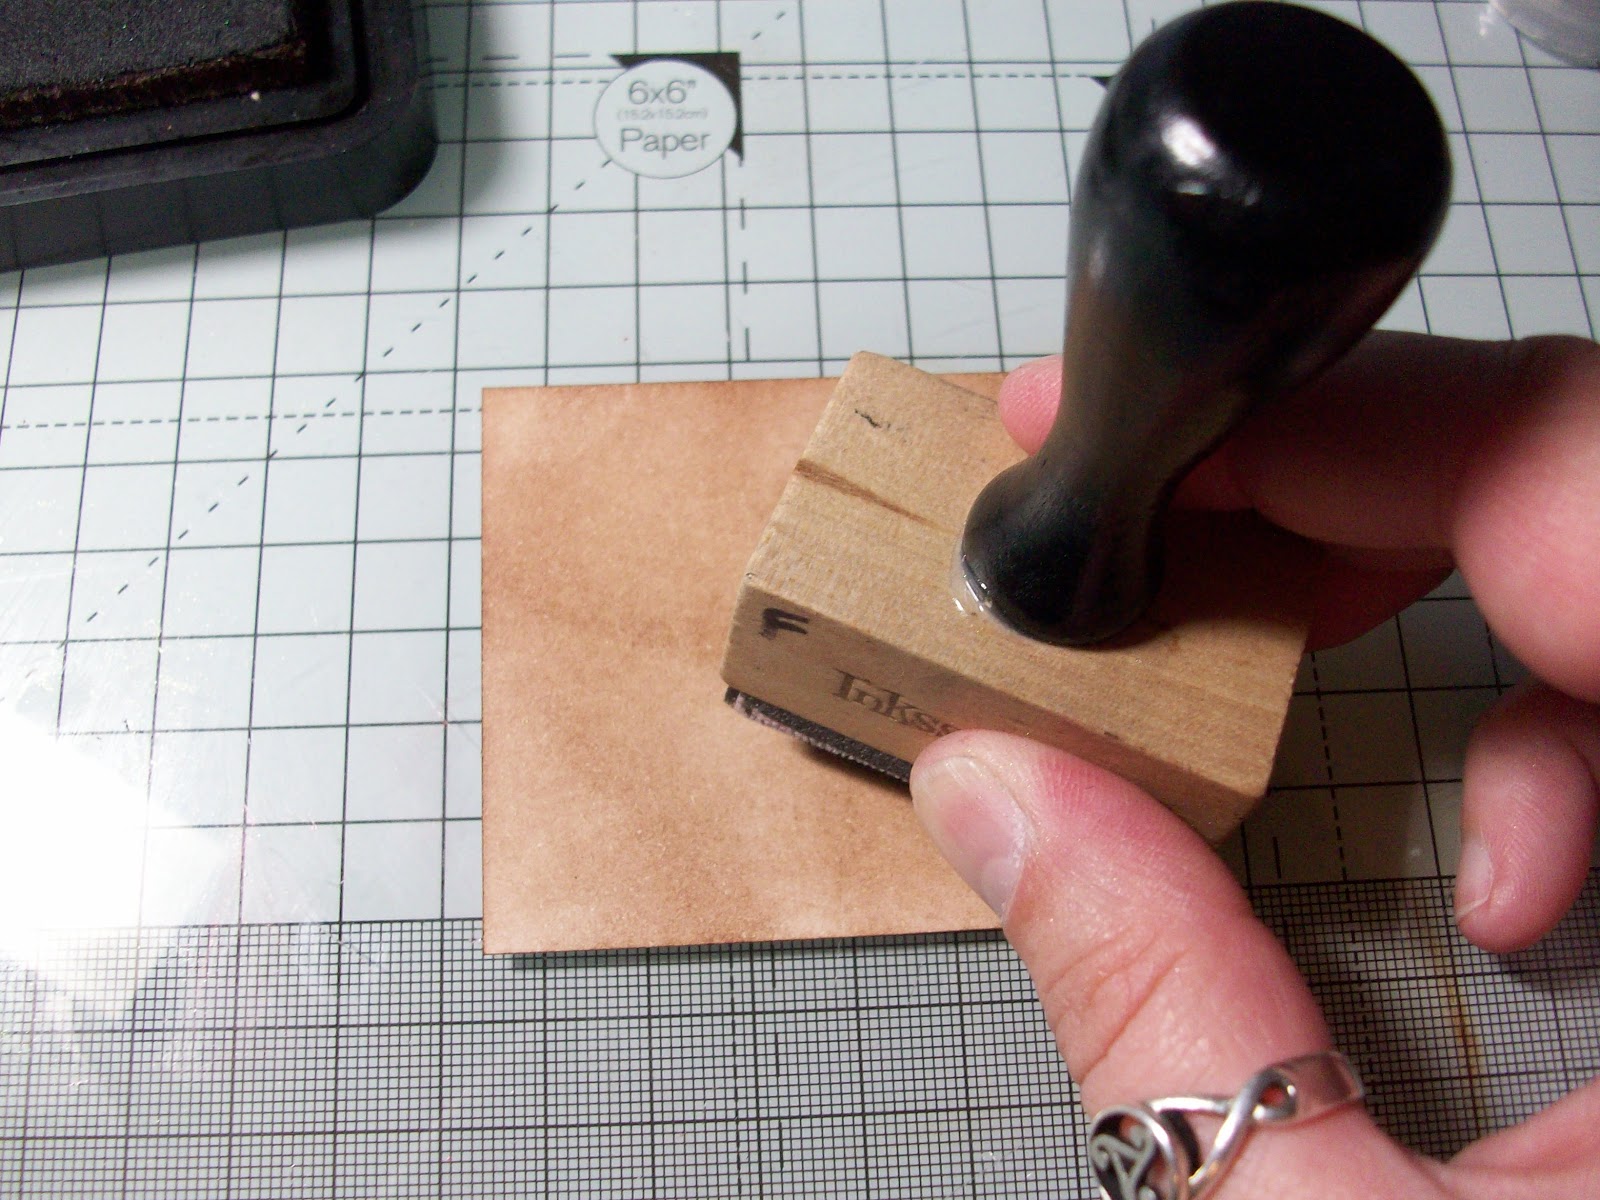
For this one, cover a piece of cardstock with Vintage Photo Distress Ink. Next you need to squirt it with hairspray so that the mica's won't stick to the background where you don't want them.


Next, ink up a stamp in clear distress embossing ink and stamp it on to the cardstock.


I've chosen the Antique Red Mica Powder from the Antique Tones set. Brush it straight over the cardstock. Because you sprayed the background with hairspray, the mica powders won't adhere to the vintage photo, it will only stick to the image stamped in clear ink.


Brush off the excess powder, and this is what you're left with. Isn't that gorgeous!


And yes...there's even more coming soon!!

-

Click here for the next part

-
 
Part 1

Part 2

Part 3

Tuesday 20 November 2012

Christmas and January Cardmaking Workshops


Are you thinking of making your own Christmas Cards this year?
Christmas Cardmaking Workshops


Whether you’re new to card-making or you want to add to your skills, there will be something for you!”

£10 per session

Tuesday Evenings from 6.30pm - 9.00pm

At:
Anne & Paul’s Sew Simple, 94 Church Road
Ashford, Middlesex, TW15 2PL

01784 255 742

All tools and materials provided to make 2-4 cards per session!

Please call to reserve your place – only 10 spaces available per session
Or you’re welcome to pop into the shop to book!

DISCOUNT ON ALL PRODUCTS PURCHASED ON THE NIGHT

(All our final Christmas workshops would be great for beginners!)

Tuesday 27th November: Waterfall Card
A fantastic interactive card! Surprisingly simple to make using just one easy-to-follow template.

Tuesday 4th December: Frame Card
A gorgeous 3D card with a beautiful DIY frame attached.

Tuesday 11th December: “Stitched” Christmas Tree
An unusual Christmas tree card with its own mini-tinsel! Very easy to make and wonderfully effective

Tuesday 18th December: Quick & Easy Cards!
A selection of fab ideas for last minute “oops I forgot you” cards! Being our last workshop before Christmas, there will also be mince pies and choccies!


Workshops run every Tuesday for 4 weeks, then 1 week off, and then begin again.
Sign up at www.anneandpauls.co.uk to receive email
 updates as new workshops are announced!


Our Cardmaking workshops will resume January 22nd 2013

As usual, Tuesday evenings from 6.30pm-9pm. The first set of dates will be:

Tuesday 22nd January
Tuesday 29th January
Tuesday 12th February
Tuesday 5th February
 
Full details of what we’re doing will be on the website and emailed to subscribers in the first weeks of January when the all the lovely new goodies arrive!

Monday 19 November 2012

Been fiddling with the website!


There is now an option to scroll through all the different videos and tutorials we have all in one place and have a good browse.

Click this link to be taken straight there so you can have a nosey!

Or if you're looking on the website itself, this is where you'll find it:


On the homepage, www.anneandpauls.co.uk,  it's a little way down on the right hand side.

I know the videos are a little bit empty at the moment, but the tutorials are very full! And I do have a plenty of other videos that I'm finishing off with all sorts of exciting things on them waiting to be put up soon.

Enjoy!


Saturday 17 November 2012

Faith's Guide to Mica Powders - Part 1

I love these little things...as anyone who's been in the shop recently and had little pots of coloured powder waved at them will know! There is sooo much that you can do with them, here are just a few things to get started.

First off, Mica Powders are really shiny pigment powders, this is what they look like;

They come in little sets of 6 with a soft, fine bristle applicator brush and an empty mini mister. That's my distress embossing ink in the photo, brilliant ink for mica techniques!

Stamping is one of the easiest fun things you can do with these clever little powders. This is the Jesse Edwards Home for Christmas Urban Stamp which I am so in love with at the moment!


So first off, ink up the stamp in clear ink. Versamark, Colorbox, Ink it Up and a variety of other clear inks will work too, but Tim Holtz's is one of the stickiest I've used so I'd recommend that one if you're after a new clear ink.


Then stamp it onto your cardstock;


I'm using Antique Tones, which are "interference" powders. That means they react with other colours, so they're great fun to use onto darker cardstock. There are other sets available which work really well onto white cardstock too, but I love the effect of the interference powders.


So, all you need to do is dip the brush that comes with the set into the powders, and gently dab it onto your cardstock.


Here I'm mixing together several different colours from the Antique Tones set. I'm using Antique Gold, Antique Red, Antique Green and Enchanted Green (Enchanted is the white-looking one)


Next, you need to brush back and forth across the cardstock to brush off the excess. When you see the powders flat on, they'll be a darkish colour like this:


But if I hold that up to my desk lamp and take a photo...


How amazing is that!! It does look even shinier in real life, the photo only half manages to capture how gorgeous this really looks!

And here's a card made with this technique:


The other technique on this card is really fun, and I've done a video tutorial on it here: Mica Powder Background Video Tutorial but I'll give you a quick run down of how it's done because I managed to take some fun photos of this technique in action!

It's very simple, first off, cover your piece of white cardstock in clear distress ink.


Next, brush on an interference powder. I'm using Antique Gold here. A light coloured powder from another set will also work, like the lovely Soft Gold from the Festive set.


Now, this will look a bit rubbish at first! Don't worry, it's supposed to. Interference powders are designed to react with other colours, and we haven't added another colour yet, we've used white cardstock and clear ink.


This is the fun bit! Next you need to add colour. I've made up a mini-mister with Black Soot Distress Ink re-inker. These are actually designed for re-inking distress pads, but you can do all sorts of fun things with them on their own. This is what they look like, and they're £3.99 to buy:


You need to add 10 drops of re-inker to a mini-mister, then fill the rest up with tap water. And then you need to spray! About 3 squirts from a distance of something like 5" works well. And as it dries, watch the magic happen!


I sat there and took a bunch of fab photos as it was drying, this took about 10 seconds or so I'd say:


How cool is that?! It becomes a gorgeous, aged vintage background. But the shine really comes out.


There is so much more than just this you can do with mica powders, but I'll get onto that next time!


-

Click here for the next part

-
 
Part 1

Part 2

Part 3

Thursday 15 November 2012

How to use Mica Flakes

Mica Flakes are really interesting! They're basically what Mica Powders start life as before they're ground down into powder form. There's tons you can do with them, but one of my favourites is making really fun little borders from them.

I know they look like they ought to be very scratchy, but they're actually incredibly soft to the touch.

They really do make fabulous borders, and they're very easy to put on with a Stick It Gluepen. I've got here a little square of card covered with Bundled Sage Distress ink, and I want to put a border on it for a card I'm making.

Using Mica Flakes

First, just squidge on a line of glue all around the edges:


 Next, smudge this with your finger to get a nice wonky border!


Sprinkle on the mica flakes. I'm using the Luna Silver here.


And just press them down around the edges.


I like to tap the excess off, then go back in and press down some more in case I've missed covering any little bits of glue.


Once you're happy with the effect, you can either give the piece of card a good flick on the back, or use a brush to brush off all the excess.


And here's my finished mica flakes card:


I'm really pleased with it! The "wish" and the snowflake were both done using Mica Powders. The little silver circle in the middle of the snowflake is one of my DIY Card Candy pieces!

More on both of those coming soon...

Tuesday 13 November 2012

Calendar Card Template

For any of our workshop-goers who would like the calendar card template, you can download a copy of it here: DOWNLOAD FILE

Monday 12 November 2012

Demo Day Goodies!

Our Demo Day went fabulously well! Was lovely to meet everyone and share some ideas for some of the gorgeous new goodies we have at the moment.

For anyone that missed the day, or anyone who wants to have a second look, here are some of the lovely things we made:

(By the way, you can see all of these on our Facebook Page too)


This is Boofle made using Tim Holtz Distress Inks, one of my favourite things!

Click here to download the instruction sheet for the Boofle Card: DOWNLOAD FILE

 This gorgeous card is made using Artiste Markers (More on those HERE) and a lovely Tulip Urban Stamp.

I love that stamp! So very cute! And the little dog just reminds me of my little dog...

Meet Buster. Totally not relevant to cardmaking, but it's a very cute photo!

Click here to download the instruction sheet for the Tulip Card: DOWNLOAD FILE

Here are a few other things made using the Artiste Markers:


We also had a play with Mica Powders! A video showing the ink-spraying technique used on the background can be found here: Mica Powder Backgrounds Video Tutorial

How gorgeous is that! When you see this card in real life, it really is amazingly shiny.

We made a few other things with Mica Powders and with Mica Flakes:


Click here to download the instruction sheet for the Mica Powders card: DOWNLOAD FILE

This is Boofle's decoupage! I do like him, he's ever so cute. And the cards we made out of the Ultimate Decoupage pack were so quick and easy to do, but the results were stunning:


The pack is so full of goodies! There are papers, boxes, borders, decoupage, toppers and so much more. I do like toppers, you can make nice quick, easy cards with them, but they look so effective when they're done:


And here is one of the little bags you get in the Boofle Ultimate Die Cut Set:


We made some other adorable little boxes too. These are ideal for little gifts, or for table decorations:


And..um...the chocolate's missing from this one! Can't think why...


Hope you enjoyed seeing it all as much as I enjoyed making it!

All the cards and other samples are on display in the shop, so if you'd like to see them in the flesh you're very welcome to pop in and have a look and we'll be happy to show you the bits we used to make them and how they were done.