Friday 22 March 2013

Faith's Guide to Fancy Scarf Yarns - Part 3 - Ronda

Ronda by Katia


1 Ball
5.5mm Needles
8 Stitches

Ronda by Katia is beautiful! When it's knitted up, it's gorgeously soft and tactile, as well as being lovely and warm. It makes a stunning scarf, but if you cast on 12 stitches instead of 8 and just sew the ends together, you can also make a cosy snood. Ronda knits in a very similar way to Tango by Woolcraft, but has a very pretty frilly edge.

Opening the Ball

Ronda is wound a little differently to the others, so when you open your ball you'll find all these little bits of string:


Don't worry, they are supposed to be there! Katia tie the ball up with these to make sure it stays nice and neat and doesn't tangle on our shelves or in your stash. Simply snip them off with a pair of scissors:


You'll end up with a big, loosely wound loop of yarn. The easiest way I've found to work with it is just to plonk it in a nice big knitting bag with nothing else in it and pull it out from there. Because of how it's wound, it doesn't tend to get tangled, which is always handy.


Casting On

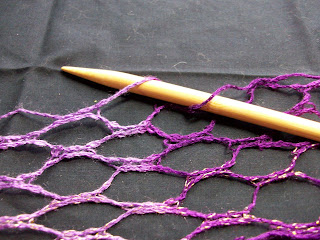
When you look at the yarn itself, you've got a load of gaps along the top edge, and loops along the bottom. It's through alternate gaps at the top that you'll be working.
So, to start with poke your needle through the first hole nearest the edge:


Then bring the needle over and down, miss a hole and poke it through the third hole:


Miss another hole and poke the needle through the 5th hole. Keep going until you have 8 stitches on your needle:


And that's your casting on finished! Couldn't be easier.

Knitting


For the first stitch of each row, knit with the very first hole, this one:


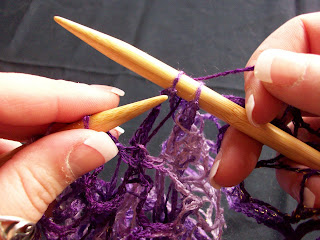
So, slide your right needle in as usual, and thread the hole round onto it:


Knit this stitch as you would with normal knitting. Then, miss a hole. Do this for every stitch after the first of each row, so you are knitting with every other hole.


Your first row will look a bit odd! Don't worry, this is normal:


Once you've done a few rows, this is what you'll end up with:


How pretty is that! It's gorgeously soft and chunky too.

Joining

If you find a join in the yarn, or if you've got two balls and want to mix and match and make a two-tone scarf, you can join Ronda incredibly easily.


Simply lay the first new hole over the last old hole:


And then knit through those two holes as if they were one:


I then knitted on a few rows so I could photograph the join to show just how invisible it is. And I was planning to point out the join so you could all see it. Problem is, I actually couldn't find it at all!! 


It's got to be somewhere about 4 or 5 rows down on that picture, but that just goes to show how invisible it really is!

Casting Off

Casting off with Ronda is a little different, but still lovely and easy to do. First off, begin by knitting two stitches. But unlike the rest of the scarf, knit with every other hole on both the first as well as second of these:


Next, poke your left hand needle into the first stitch to grab hold of it:


Then use your needle to pass the first stitch over the second and off the needles:


Knit the next stitch as normal so you have two stitches on the right handle needle again, then pass the first of these stitches over the second again. 


Keep knitting one, then passing one over until you've passed over the final one and have only one stitch left on your right hand needle:


Then snip the yarn a few holes along:


And thread the entire end through that final stitch and pull it tight:


Knot this off a couple of times, and then hide your knots in the ruffles:


Once you've pulled the ruffles out and evened everything off, the cast off edge will be nicely hidden!


Beautiful! 


Snood Pattern

The Ronda Snood is incredibly easy to make, because it's knitted in exactly the same manner as the Scarf. The only difference is that you cast on 12 stitches. When you've finished, simply sew one end to the other using a normal needle and cotton.


Just look at the cosiness!! How lovely is that?

-

Part 1
Part 2
Part 3

Wednesday 20 March 2013
Cardmaking Workshops 2nd April - 23rd April


Cardmaking Workshops
“Whether you’re new to card-making or you want to add to your skills, there will be something for you!”

£13 per session

Tuesday Evenings from 6.30pm - 9.00pm

At:
Anne & Paul’s Sew Simple, 94 Church Road
Ashford, Middlesex, TW15 2PL

01784 255 742

All tools and materials provided to make 2-4 cards per session!

Please call to reserve your place – only 10 spaces available per session
Or you’re welcome to pop into the shop to book!

DISCOUNT ON ALL PRODUCTS PURCHASED ON THE NIGHT

Tuesday 2nd April: Super Shrink Plastic!
Have a go with the wonderful world of shrink plastic! Create some gorgeous cards with little removable trinkets.
(This workshop is ideal for beginners)

Tuesday 9th April: The Sticky Die Cutting Technique
A fabulously fun technique to create sticky die cut elements, and a lazy way to stick fiddly die cutting down! Create a gorgeously tactile mixed-media card using your Die Cutting Machine.
(This workshop is ideal for beginners)

Tuesday 16th April:  Keepsake Box Card
True Papercrafting! A beautiful interactive card to treasure forever, as well as a lovely handmade card gift box.
(This workshop is ideal for beginners)

Tuesday 23rd April: Build-a-Scene Pop Up Card
A really intricate, yet simple to make pop up card using the fabulous XCut Build a Scene Dies and the Sizzix Bigshot.

Don’t forget our Free Fancy Scarf Yarn Demo on Saturday 23rd March 10am-4pm! Come along and try before you buy!

Workshops run every Tuesday for 4 weeks, then 1 week off, and then begin again.
Sign up at www.anneandpauls.co.uk to receive monthly money off vouchers & email updates as new workshops are announced!


Tuesday 19 March 2013

Faith's Guide to Fancy Scarf Yarns - Part 2 - Triana & Rocio

The original fancy scarf yarn! Triana is just stunning, it's really got to be one of my favourites. Beautifully floaty and elegant, and available in more colours and varieties than you could shake a stick at. (Including a brilliant bright Kawasaki green to match my bike!!) Rocio and Triana are exactly the same to knit with, here's how they work...

Triana by Katia


Triana:
1 Ball
8mm Needles
8 Stitches

Rocio:
1 Ball
7mm Needles
8 Stitches

Triana is available in Triana Plain, which is all the variegated plain colours, and Triana Lux, which is the sparkly version I'm using here. Or of course there's the lovely bobbly version, Rocio.


The nicest thing about this yarn is how quick it is to knit. Knitting only about 4 rows gives you a piece of knitting about 4" long! When it's knitted up, Triana is a gorgeously floaty scarf, which is surprisingly warm and soft. The sparkly Lux variety is also very soft, and has none of that itchiness you often get with sparkly yarns. Using Bamboo needles is particularly helpful with Triana because the holes are so large. Bamboo needles are much less slippery that metal or plastic, so the stitches stay put when you're working with them and don't slide around too much.

When you pull Triana out, you'll find you've got a thick edge, which is the bottom, and a thin edge, which is the top you'll be working with. 


Casting On

Pull the yarn out and lay it on your table to begin. (You can hold the yarn up to do this, but it's easier to start with to use a table!) Poke your needle through the first hole like this:


Then bring your needle over and down and poke it through the next hole:


Once you've got 8 stitches on, you should end up with something looking like this:


Knitting

You'll be knitting with these holes along the top here:


Slide your needle in as with normal knitting, and then wind that hole around the right hand needle:


Put your needle through and off just like normal. On your next stitch, you'll be able to see the hole you've just used. All you need to do is move along one and use the next hole:


Once you've knitted the whole of your first row, you'll end up with something looking like this:


Just turn around and knit the next row in exactly the same way. (The scarf is all Knit, no Purl) After you've done a few rows, this is what you'll end up with:


So pretty isn't it?

Joining

Due to the way that Triana is made, you might occasionally come across a knot, or perhaps you might want to mix some colours to make a unique scarf. Either way, joining is really easy to do, and is practically invisible when it's done.

Start by snipping your two ends roughly straight:


Then lay the first hole of the new piece over the last hole of the old piece like this:


Knit these two holes together as if they were one:


And when it's done, spot the join...


Here it is, but it falls underneath the ruffles so won't be visible when the scarf is worn. How neat is that?


Casting Off

Casting off Triana is very similar to regular casting off. Knit your first two stitches:


Then hook your left needle under the first of these:


And pass it over the second stitch and off the needle:


Knit another stitch, so you have two stitches on your right needle again:


Now pass the first of these over as before. Keep going until you only have one stitch left:


Snip the yarn, and pass the whole strand through that last stitch:


Pull that tight:


And then knot it off:


When you're done, trim the end nice and close and hide it inside the ruffles at the bottom:


When the scarf is worn, the ends won't show at all because of the way it hangs.

Fabulous aren't they? Triana is one of the quickest of the fancy scarf yarns to knit. You really can easily do one in an evening if you want to. And the same applies to Rocio.

Here it is knitted up:


You'd be amazed just how soft those little bobbles are! They're lovely and squishy. Knitting Rocio is exactly the same as knitting Triana. It's just that instead of having to look for the the thick edge, the bobbles are the bottom edge. The holes along the top are identical to Triana, just slightly smaller.

Personally, I'd recommend using 7mm needles on Rocio, because I found it easier to knit on slightly smaller needles. You still cast on the 8 stitches just like you do with Triana.

-

Click Here for Next Part

-

Part 1
Part 2
Part 3