Monday 24 December 2012

Merry Christmas!

Wishing all our customers a very Merry Christmas and a Happy New Year from everyone at Anne and Paul's!

And just look what Santa has brought us...


All these lovely goodies are due out in January...but they're here early! We won't tell if you don't!

And that's not even half of what has arrived!
Loving the new Chronology range, some really beautiful things in it. This is the decoupage:


And I adore this topper sheet, definitely Spiffing!


These gorgeous distressed metal elements really need to be seen, they are lovely!


I think this is my favourite stamp so far...but there are a load of other lovely new urban stamps to choose from too, so I'm not sure, they're all yummy!
 
Vintage Notes is another new range. Gorgeous pastel colours and Vintage designs. Love these delicate card blanks! There are three designs in the pack. If you zoom in on the picture you should be able to see them on the top left corner of the packet.


These are the "big elements". Fabulous if you want a nice quick card!

 And of course the paper pack. Comes in 6x6 and 12x12.

My bargain buy recommendation would have to be the goody bag though! It's £15 and it's got a bit from each of the new ranges, including that wonderful spiffing topper!

 
I just had to leave a gap at the end to show you all a photo of Buster in his wonderful new Christmas Jumper!! It's knitted in the lovely Stylecraft Aran with wool which we sell, and we have the pattern in stock now.


Doesn't he look so festive and cheerful!

Merry Christmas everyone! And if I don't see you before, I hope to see you all in January for our annual January Sale!

-


Tuesday 18 December 2012

Christmas Opening Hours 2012/13 (Feltham)


Anne and Paul's Feltham Woolshop
57A High Street
Feltham
Middlesex
TW13 4EZ
0208 893 7779 

www.facebook.com/felthamwoolshop

Saturday 15 December 2012

Christmas Opening Hours 2012/2013 (Ashford)


Just to let everyone know...
Our Cardmaking workshops will resume January 22nd 2013
As usual, Tuesday evenings from 6.30pm-9pm. The first set of dates will be:
Tuesday 22nd January
Tuesday 29th January
Tuesday 12th February
Tuesday 5th February
 
Full details of what we’re doing will be on the website and emailed to subscribers in the first week of January when the all the lovely new goodies arrive!

Anne and Paul's Sew Simple
94 Church Road
Ashford
Middlesex
TW15 2PL


Saturday 8 December 2012

Faith's Guide to Mica Powders - Part 3

Hello! Back with some more Mica Powder ideas. I've been playing with these so much recently, and I've got a couple more awesome techniques to show you.

Regular Micas and Stamping

First off, I just wanted to show how lovely one of the colours from the Festive set of mica powders is!

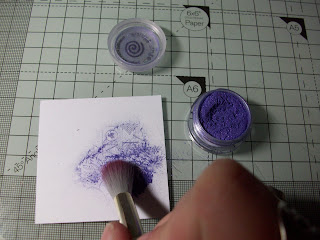
I've stamped on to white cardstock in the clear Distress Embossing Ink again, and I'm brushing on Regal Purple mica powder.


As usual, I'm brushing off all the excess.


And look at that!! Stunning :)


Negative Stamping

This is a really unusual technique using a combination of Mica Powders and Distress Ink. Distress Ink has got to be one of my favourite crafting goodies! So I just love how much you can do with micas and distress ink together.

To begin with, ink up a piece of card in Dusty Concord and brush on the purple mica powder. Don't set the mica powder yet.


Next, you need a stamp. I'm using one of the clear stamps from the Papermania Mistletoe Kisses set.


Ink up your stamp with the clear Distress Embossing Ink.


Stamp this onto your card and it will lift off the Mica Powder to give a fabulous negative image! Make sure you clean and re-ink your stamp each time if you want to stamp it a few times.


The distress ink underneath will show through. For this one, I've used purple ink and purple powder. But you can get some really fun results by using different colour combinations. Bundled Sage distress ink and white mica powder is a fun one.


Look at the shininess!!


Just gorgeous!

And to finish with, here's a lovely card made with Mica Flakes and lots of Mica techniques at once!


And here are a few more cards made using Mica Powders:


These ones are done with a gluepen. Add detail to the image with the gluepen, then let it dry. Once it's clear and tacky, just brush over the mica powders.


Gold Mica powder stamped onto black cardstock. This is Antique Gold from the Antique Tones set.


Hope you've enjoyed!

-

Click here for the Guide to Mica Flakes

-
 
Part 1

Part 2

Part 3

Tuesday 4 December 2012

How to make DIY Card Candy

These little things are dead easy to make, and really fun! So I thought I'd pop up a quick tutorial to show how I make them.

You can use card candy anywhere you'd normally use a brad or a gem, and the first thing you need to make it is the world's cutest paper punch...

How dinky is that!

You also need an embossing tool and some funky foam. I've chosen here to make my card candy out of gold mirri card.


Because I'm really into card candy at the moment, I've made myself a little card candy mat! It's just a bunch of squares of funky foam glued together. A single sheet of funky foam works fine, but if you want the honest truth, I've done this because this is chunkier, which makes it easier to find in the depths of my craft bag!!

 
To begin with, punch out a little circle from card.


Paper does work too by the way, but I prefer something a bit more solid so I tend to make my card candy from  card.


Next, turn your little circle over and place it upside down on your funky foam.


Push down all around the edges to shape the circle into a little dome.


Don't push in the centre, just around the edges. When you're done, it should look something like this:


Here it is the right way up. Voila! A little fake brad!


I decided to add some card candy to one of the cards we made at our demo. To stick it on, add little dots using one of the £1 stick it gluepens.


Don't be afraid to use fairly large dots, these gluepens dry clear anyway, so if you smudge a bit it won't matter.


Lift up your card candy using tweezers, and just pop them on top of the dots. Don't press them down, because you don't want to risk squishing them. Just gently drop them on.


And when you're done, I promise they'll look lovely!


Here are some more. These have been made by colouring a bit of white card with Vintage Photo Distress Ink, then punching out the circles.


Distress-Inked Card Candy is really cool, because when you look at them close up, they almost look like velvet!


Gorgeous aren't they? And so very simple to make.

Hope you've enjoyed!